The smokey eye is a timeless makeup look that exudes mystery, glamour, and confidence. Whether you’re heading to a party, a date, or just want to experiment with a bold style, mastering the smokey eye is a must. But where do you begin? If you’ve ever felt overwhelmed by blending brushes or intimidated by dark eyeshadow, you’re in the right place. Let’s break down the smokey eye into easy, manageable steps.
Table of Contents
1. Introduction to Smokey Eye

The smokey eye is more than just a makeup trend—it’s a classic technique that has stood the test of time. This sultry look is all about creating a gradient effect that transitions smoothly from light to dark, mimicking the natural play of shadows and light. While it may seem intimidating at first, the beauty of the smokey eye lies in its versatility.
You can tailor this look to suit any occasion, mood, or eye shape. Think of it as your makeup wardrobe’s “power suit.” A well-executed smokey eye can make you feel like you’re ready to own the room, whether it’s a casual outing or a glamorous event. Plus, you’re not limited to traditional blacks and grays—modern smokey eyes can feature everything from earthy browns to bold jewel tones, making it a look that evolves with your personal style.
2. Tools You’ll Need
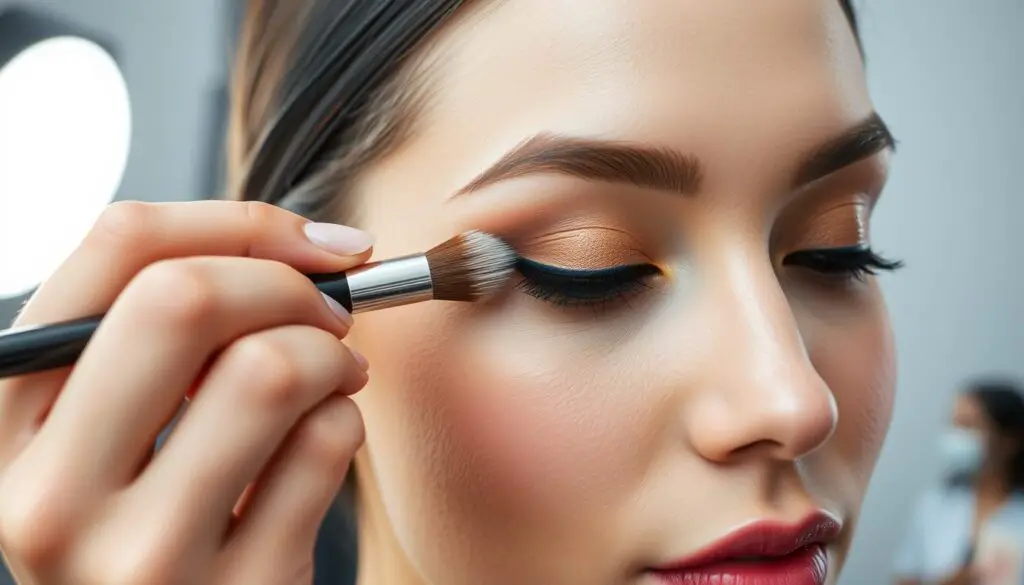
Before you dive into creating the perfect smokey eye, it’s essential to gather the right tools and products. Imagine trying to paint a masterpiece without the right brushes or colors—frustrating, right? The same principle applies here. Here’s a list of everything you’ll need to get started:
Eyeshadow Palette
Look for a palette that includes a range of shades, from light neutrals to deep, rich colors. A mix of matte and shimmer shadows gives you the flexibility to create depth and dimension.
Blending Brushes
Invest in quality brushes, especially a fluffy blending brush. The secret to a flawless smokey eye is in the blending, and the right tools make all the difference. A smaller, denser brush for precise application is also helpful.
Eyeliner
A creamy pencil or gel eyeliner works best for this look. It’s easier to smudge and blend compared to liquid liners, which are more rigid.
No smokey eye is complete without thick, luscious lashes. A volumizing mascara will give you the dramatic finish this look demands.
Primer
An eyeshadow primer is your best friend for this look. It ensures your shadows stay in place and look vibrant throughout the day or night.
Cotton Swabs or Makeup Wipes
Mistakes happen, even to the best of us. Having cotton swabs or wipes handy allows you to clean up any smudges without starting over.
By arming yourself with these tools, you’re setting the stage for smokey eye success. Think of it as assembling your beauty toolkit—it’s the first step in creating a look that turns heads.
3. Prepping Your Canvas

Creating a flawless smokey eye starts with a well-prepared base. Think of your eyelids as the canvas for a painting—smooth, clean, and primed for creativity. Prepping your eyes not only makes application easier but also ensures your masterpiece lasts all day without smudging or fading.
Clean and Moisturize
Begin by washing your face to remove any oils or leftover makeup. This helps your eyeshadow adhere better to your skin. Afterward, apply a lightweight moisturizer around your eyes to keep the delicate skin hydrated. Avoid heavy creams that could cause your makeup to slip.
Apply Primer
A good primer is the unsung hero of a great smokey eye. Dab a small amount of eyeshadow primer onto your eyelids and blend it out evenly. This step creates a smooth surface for your eyeshadow, prevents creasing, and enhances the vibrancy of your colors. If you don’t have a primer, a bit of concealer and translucent powder can work in a pinch.
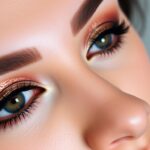
4. Choosing the Right Colors
The smokey eye might be synonymous with blacks and grays, but it’s so much more than that. The beauty of this look is its adaptability to different styles, occasions, and personal preferences. Whether you’re going for a classic vibe or something bold and experimental, choosing the right shades is crucial.
Classic Tones
For a timeless smokey eye, stick to a palette of black, charcoal, and gray tones. These shades create depth and drama, making your eyes the focal point of your look.
Neutral and Earthy Hues
If you’re looking for something more subtle or work-appropriate, try browns, taupes, and bronzes. These colors soften the intensity of the smokey eye while maintaining its signature blend.
Bold and Creative Colors
Want to add a pop of personality? Jewel tones like emerald green, sapphire blue, or deep purple can make your smokey eye unique and eye-catching. These shades work especially well for evening events or when you’re feeling adventurous.
Shimmer vs. Matte
Shimmer shades add a touch of glamour and are perfect for the inner corners or center of your eyelid. Meanwhile, matte shades are ideal for blending and creating depth. A mix of both gives you the most polished result.
By carefully selecting your colors, you can tailor your smokey eye to fit your mood, outfit, or the occasion. Remember, the goal is to create a gradient effect that enhances your natural beauty and draws attention to your eyes.
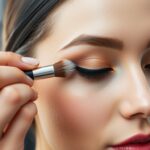
5. Step-by-Step Smokey Eye Guide
Now that you’ve prepped your canvas and chosen your colors, it’s time to bring your smokey eye to life. Follow these simple steps to achieve the perfect blend of light and dark shades.
Step 1: Start with a Base Shade
Using a fluffy brush, apply a neutral shade (close to your skin tone) all over your eyelid. This creates a smooth foundation for the rest of your shadows and makes blending easier.
Step 2: Add Depth with a Medium Tone
Choose a medium-toned shade, like a soft brown or taupe, and apply it to your crease. Use windshield wiper motions to blend it back and forth, creating a soft transition.
Step 3: Darken the Outer Corner
Take your darkest shade—whether it’s black, deep brown, or another bold color—and focus it on the outer “V” of your eyelid. Blend it inward slightly to create a gradient effect.
Step 4: Line Your Eyes
Use a creamy eyeliner pencil or gel liner to draw a line along your upper lash line. Smudge it gently with a small brush or your fingertip for a softer, smokier look. Apply the same liner to your lower lash line and blend.
Step 5: Highlight Key Areas
To make your eyes pop, use a shimmery, light shade on the inner corners of your eyes and under your brow bone. This brightens up the look and adds dimension.
Step 6: Blend, Blend, Blend
Take a clean blending brush and go over your entire lid to ensure all shades transition seamlessly. Harsh lines are the enemy of a good smokey eye.
Step 7: Apply Mascara
Finish with several coats of volumizing mascara to add drama and complete the look. If you want extra flair, false lashes are a great addition.
By breaking the process into these simple steps, you’ll find that creating a smokey eye isn’t as daunting as it seems. Practice makes perfect, so don’t be afraid to experiment until you find what works for you.
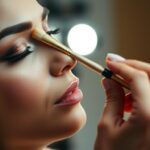
6. Tips for Seamless Blending

Blending is the heart of the smokey eye. A poorly blended look can appear patchy or harsh, while seamless blending transforms your eyeshadow into a smooth, professional-looking gradient. It’s not just about the shades you choose; it’s how you combine them.
Use the Right Brushes
Blending brushes are designed with soft, fluffy bristles that diffuse color evenly. Avoid stiff brushes, as they can create streaks. A tapered blending brush works well for precision, while a larger one is great for diffusing edges.
Start Light, Build Gradually
Begin with lighter shades and gradually add darker tones. It’s easier to build intensity than to fix over-applied dark shadow. Layering also creates depth and dimension.
Blend in Small, Circular Motions
Using gentle, circular motions softens the edges of your eyeshadow, ensuring a smooth transition between colors. A windshield wiper motion works well for the crease.
Clean Your Brush Between Colors
To avoid muddying your colors, wipe your brush on a clean tissue before blending a new shade. This ensures each color remains vibrant and distinct.
7. Common Mistakes to Avoid
Even seasoned makeup lovers make mistakes when attempting a smokey eye. Recognizing these common pitfalls can save you time and frustration.
Skipping Primer
Eyeshadow creases and fades without a proper base. Primer keeps your masterpiece intact all day long.
Overusing Dark Shades
It’s tempting to dive straight into black or deep colors, but starting too dark can overwhelm your eyes. Build intensity gradually.
Ignoring Blending
Harsh lines ruin the effect of a smokey eye. Spend extra time blending for a polished look.
Using the Wrong Brush
Precision tools make a huge difference. Using the wrong brush can make application uneven and difficult to control.
Neglecting Cleanup
Dark shadows can fall under your eyes, creating a messy look. Use a tissue or powder under your eyes while applying, and clean up any fallout with a makeup wipe.
8. Smokey Eye for Different Occasions
One of the best things about the smokey eye is its adaptability. You can tone it down for casual settings or dial it up for special events.
Casual and Daytime
For a daytime look, go for neutral eyeshadow shades like taupe, beige, or soft browns, which are versatile and complement most skin tones. Keep the eyeliner light—perhaps just a thin line close to the lash line to define your eyes without being too bold. Skip the heavy mascara to keep things fresh and natural. A soft, subtle smokey eye can be a great choice for work or brunch with friends, as it adds depth and interest without looking too intense. The goal is a polished yet effortless look that enhances your features while keeping things low-key.
Formal Events
For a formal smokey eye, stick to classic black and gray tones to create a sophisticated, timeless look. Start by applying a soft gray or taupe base across the lids, then gradually build up the intensity with black in the outer corners and along the lash line to create depth and drama. Blend well to ensure a smooth transition between shades. To elevate the elegance, add a touch of shimmer or metallic eyeshadow to the center of the lids and the inner corners of your eyes—this will brighten the look and make it more refined. Finish with a few coats of mascara to add volume and length, and you’ll have a glamorous smokey eye that’s perfect for formal events.
Fun and Experimental
For festivals, nights out, or costume parties, don’t shy away from bold colors and glitter. Jewel tones like emerald or sapphire add a unique twist to the traditional smokey eye.
9. Smokey Eye Variations
The traditional smokey eye is iconic, but you can experiment with different variations to suit your personal style or the mood of the occasion.
Bronze Smokey Eye
Perfect for summer or daytime events, a bronze smokey eye uses warm golden and brown tones for a sun-kissed effect.
Plum Smokey Eye
Deep purples and mauves are a softer alternative to black and gray, ideal for a romantic dinner or a date night.
Metallic Smokey Eye
For a high-impact evening look, incorporate metallic shades like silver, gold, or copper into your smokey eye.
Soft Smokey Eye
Focus on blending earthy tones for a more natural, understated look that’s perfect for beginners or casual settings.
10. How to Pair with Lip Looks
Balancing your smokey eye with the right lip color is essential. The wrong lip shade can distract from your eye makeup, while the right one enhances it.
Nude Lips
A nude or soft pink lip is a classic choice for a bold smokey eye. It lets your eyes remain the star of the show.
Bold Lips
Feeling adventurous? Pair your smokey eye with a striking red or berry lipstick. This look exudes confidence and drama.
Glossy Finish
For a fresh, youthful vibe, opt for a sheer gloss that complements the tones in your eyeshadow.
11. Daytime Smokey Eye Tips
Yes, you can rock a smokey eye during the day! The key is to keep it subtle and natural.
Use Soft Colors
Stick to light browns, taupes, or rosy tones. Avoid intense blacks or deep shades.
Skip Heavy Liner
Instead of a bold liner, opt for a soft smudged pencil or no liner at all.
Lighten the Inner Corners
Brighten your eyes with a light, shimmery shade in the inner corners. It opens up your eyes and makes the look less intense.
12. Night-Out Smokey Eye Tips
For an evening event, the smokey eye is your go-to look for glam and allure.
Amp Up the Drama
Use dark, rich colors like black, charcoal, or navy. Don’t be afraid to add extra layers for intensity.
Add Glitter or Metallics
A touch of sparkle on your lids takes your smokey eye from chic to dazzling.
False Lashes
Enhance the drama with false lashes or a volumizing mascara for a fluttery finish.
13. Removing a Smokey Eye Safely
After a long day or night, removing your smokey eye properly is crucial to avoid irritating your skin or eyes.
Use a Gentle Makeup Remover
Choose an oil-based remover for stubborn makeup. Soak a cotton pad and press it gently against your eyes before wiping away.
Avoid Harsh Scrubbing
Be gentle with your skin. Use soft motions to remove the makeup without pulling or tugging.
Hydrate Your Skin
After removing makeup, apply a nourishing eye cream to hydrate the delicate skin around your eyes.
This detailed breakdown provides all the tools and insights you need to master the smokey eye, whether you’re a beginner or looking to refine your technique!
14. FAQs About Smokey Eye
1. What is the easiest way to blend eyeshadow for a smokey eye?
Use a clean blending brush and small circular motions to diffuse harsh lines.
2. How do I keep my smokey eye from smudging?
Always use an eyeshadow primer and set your makeup with a translucent powder.
3. Can I do a smokey eye with just eyeliner?
Yes, smudge your eyeliner with a brush or your finger for a quick smokey effect.
4. What’s the best eyeshadow palette for beginners?
Look for palettes with neutral tones and a mix of matte and shimmer shades.
5. How do I make my smokey eye look more natural?
Stick to soft, neutral tones and avoid heavy eyeliner.
Mastering the smokey-eye might seem challenging at first, but with practice and the right techniques, you’ll be creating stunning looks in no time. Whether you’re going for classic drama or subtle elegance, this guide has you covered. Now, grab your brushes and start blending!